This article will demonstrate about how to get data using Dapper and Repository Pattern in Web API and how to use Dependency Injection using Unit of Work in Web API. I will show you how to implement Generic Repository with Custom Repository for CRUD operations.

Here we are using Dapper.Net for accessing the data through .net data access provide. So, first question comes in mind is that what is actually a Dapper and Why we use it. So, let move one by one with example.
What is Dapper
It is an ORM [Object Relational Mapper], basically a open source and lightweight ORM for developers who prefer to work with ADO.Net technology. It is in top most ORM which ensures the high performance. Main theme to develop it by Stack OverFlow team is the fastest database transaction. It works with both static and dynamic objects. It extends the IDbConnection interface to make connection and execute the database operations.
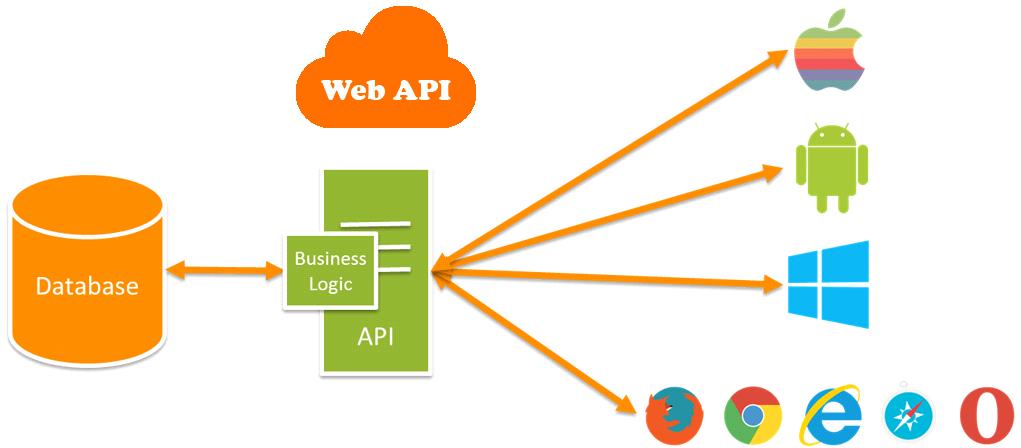
What is Web API
Web API is a framework that is used to make HTTP services. As you know, now days we are using mobiles, tablets, apps and different types of services, so Web API is a simple and reliable platform to create HTTP enabled services that can reach wide range of clients. It is used to create complete REST services. To know more just visit my article Who is the Winner Web API or WCF article on CsharpCorner.
What is Repository Pattern
Repository Pattern is used to create an abstraction layer between Data Access Layerr and Business Logic Layer of an application. Repository directly communicates with data access layer [DAL] and get the data and provides it to business logic layer [BAL]. The main advantage to use repository pattern to isolate the data access logic and business logic. So that if you make changes in any of this logic that can't effect directly on other logic. For more information, please gone through by Repository Pattern Article.
Web API Project with Data Access Layer
Now it is time to practical example how to implement Dapper and Repository Pattern with Web API Project. Create a solution name as "DapperAndWebAPI" with a class library project name as "DataAccess" and make following folders for differnet activities.
Entities: This will contain all the entity class files.
Infrastructure: It will include all data access required file like connection class.
Repositories: This will include Generic and Custom Repositories.
Services: It includes all the business logic related classes.
UnitOfWork: This is important folder for this demonstration which includes UnitOfWork Class for transaction.
Test API: It is a Web API project for creating HTTP enabled services.
Our project structure will be like as following image shown below.

Inside the Infrastructure folder create an interface named as IConnectionFactory which contains the GetConnection property which returns IDbConnection type connection. Implement IConnectionFactory interface with ConnectionFactory class. IDbConnection handles all the database connection related queries.
public class ConnectionFactory : IConnectionFactory
{
        private readonly string connectionString = ConfigurationManager.ConnectionStrings["DTAppCon"].ConnectionString;
        public IDbConnection GetConnection
        {
            get
            {
                var factory = DbProviderFactories.GetFactory("System.Data.SqlClient");
                var conn = factory.CreateConnection();
                conn.ConnectionString = connectionString;
                conn.Open();
                return conn;
            }
        }
}
Create two entity classes as named "Blog" and "Category" inside the Entities folder which contains the characters for Blog and Category classes as following. All the sample classes we can find from Download Source.
 public class Blog
 {
        public int PostId { get; set; }
        public string PostTitle { get; set; }
        public string ShortPostContent { get; set; }
        public string FullPostContent { get; set; }
        public string MetaKeywords { get; set; }
        public string MetaDescription { get; set; }
        public DateTime PostAddedDate { get; set; }
        public DateTime PostUpdatedDate { get; set; }
        public bool IsCommented { get; set; }
        public bool IsShared { get; set; }
        public bool IsPrivate { get; set; }
        public int NumberOfViews { get; set; }
        public string PostUrl { get; set; }
        public virtual int CategoryId { get; set; }
        public virtual Category Categories { get; set; }

 }
Now it is time to create repositories, so first we will create GenericRepository which will include all the common methods which can be used for CRUD operations like Add, Delete and Update etc.
public interface IGenericRepository<TEntity> where TEntity : class
{
        TEntity Get(int Id);
        IEnumerable<TEntity> GetAll();
        void Add(TEntity entity);
        void Delete(TEntity entity);
        void Update(TEntity entity);
}
Following class as name "GenericRepository" is implementing the IGenericRepository. I am not here adding the implementation code here because I am using Custom Repository for this demonstration. You can implement it if you require.
 public class GenericRepository<TEntity> : IGenericRepository<TEntity> where TEntity : class
 {
        public void Add(TEntity entity)
        {
            throw new NotImplementedException();
        }

        public void Delete(TEntity entity)
        {
            throw new NotImplementedException();
        }

        public void Update(TEntity entity)
        {
            throw new NotImplementedException();
        }

        public TEntity Get(int Id)
        {
            throw new NotImplementedException();
        }

        public IEnumerable<TEntity> GetAll()
        {
            throw new NotImplementedException();
        }
 }
Implementation Dapper with Data Access Project
For add Dapper is with your project, just open Package Manager Console from Tools menu and install Dapper using this command Install-Package Dapper. It will also add and resolve dependent dependencies for Dapper. At last it will show successfully installed message for Dapper.
Note: Don't forget to select Default Project name as DataAccess.

Custom Repository and Implementation
Create a new repository class name as "BlogRepository" which implement GenericRepository and IBlogRepository. For this demonstration, I am using Dependency Injection, so for creating the object, I am using constructor dependency injection. I have created a GetAllBlogByPageIndex method which will return list of blog using dapper asynchrony. I am here using very popular feature of C# as "Async" and "Await" for asyncronous process.
Here SqlMapper is Dapper object which provides variety of methods to perform different operation without writing too much of codes.
 public class BlogRepository : GenericRepository<Blog>, IBlogRepository
 {
        IConnectionFactory _connectionFactory;

        public BlogRepository(IConnectionFactory connectionFactory)
        {
            _connectionFactory = connectionFactory;
        }
        public async Task<IEnumerable<Blog>> GetAllBlogByPageIndex(int pageIndex, int pageSize)
        {
            var query = "usp_GetAllBlogPostByPageIndex";
            var param = new DynamicParameters();
            param.Add("@PageIndex", pageIndex);
            param.Add("@PageSize", pageSize);
            var list = await SqlMapper.QueryAsync<Blog>(_connectionFactory.GetConnection, query, param, commandType: CommandType.StoredProcedure);
            return list;
        }
 }
Here I am using UnitOfWork class to make all required actions in one transaction. This class keeps track everything when doing business transaction and at ends gatter all the information and submit it to database in one transaction. As I have figured out when we are working with multiple repositories and have changes with these repositories and save it using SaveChanges() method in one transaction, here UnitOfWork comes in picture to do the same task.
Read a very good article by Asp.Net for Repository Pattern and UnitOfWork.
public class UnitOfWork : IUnitOfWork
{
        private readonly IBlogRepository _blogRepository;
        public UnitOfWork(IBlogRepository blogRepository)
        {
            _blogRepository = blogRepository;
        }

        void IUnitOfWork.Complete()
        {
            throw new NotImplementedException();
        }

        public IBlogRepository BlogRepository
        {
            get
            {
                return _blogRepository;
            }
        }
}
Following is the class which handles all the business logic using UnitOfWork. When we work with enterprize application with multiple components like Repository, Business logic, Services, Third Party Tools etc then this service class plays a vital role in this.
 public class BlogService : IBlogService
 {
        IUnitOfWork _unitOfWork;
        public BlogService(IUnitOfWork unitOfWork)
        {
            _unitOfWork = unitOfWork;
        }
        public async Task<IEnumerable<Blog>> GetAllBlogByPageIndex(int pageIndex, int pageSize)
        {
            return await _unitOfWork.BlogRepository.GetAllBlogByPageIndex(pageIndex, pageSize);
        }
 }
Implement UnityResolver with Web API
First I am going to add Unity package library with TestAPI project to run the UnityResolver class. To install Unity from Package Manager Console, just use "Install-Package Unity" command and press enter. It will resolve all the dependent dependencies and add the Unity package with TestAPI project.

Dependency Resolution with the Unity Container
Following class is a UnityResolver class which resolves all the dependencies. I have taken this class from this article, This class resolves the dependency for the class and return the service instance.
As per Asp.Net
public class UnityResolver : IDependencyResolver
{
        protected IUnityContainer container;

        public UnityResolver(IUnityContainer container)
        {
            if (container == null)
            {
                throw new ArgumentNullException("container");
            }
            this.container = container;
        }

        public object GetService(Type serviceType)
        {
            try
            {
                return container.Resolve(serviceType);
            }
            catch (ResolutionFailedException)
            {
                return null;
            }
        }

        public IEnumerable<object> GetServices(Type serviceType)
        {
            try
            {
                return container.ResolveAll(serviceType);
            }
            catch (ResolutionFailedException)
            {
                return new List<object>();
            }
        }

        public IDependencyScope BeginScope()
        {
            var child = container.CreateChildContainer();
            return new UnityResolver(child);
        }

        public void Dispose()
        {
            container.Dispose();
        }
}
Register all the dependencies with UnityContainer in the WebAPIConfig file and provide UnityContainer instance to DependencyResolver to resolve all the dependency at run time.
public static class WebApiConfig
{
        public static void Register(HttpConfiguration config)
        {
            var container = new UnityContainer();

            container.RegisterType<IBlogRepository, BlogRepository>();
            container.RegisterType<IConnectionFactory, ConnectionFactory>();
            container.RegisterType<IUnitOfWork, UnitOfWork>();
            container.RegisterType<IBlogService, BlogService>();
            config.DependencyResolver = new UnityResolver(container);


            // Web API configuration and services
            // Configure Web API to use only bearer token authentication.
            config.SuppressDefaultHostAuthentication();
            config.Filters.Add(new HostAuthenticationFilter(OAuthDefaults.AuthenticationType));

            // Web API routes
            config.MapHttpAttributeRoutes();

            config.Routes.MapHttpRoute(
                name: "DefaultApi",
                routeTemplate: "api/{controller}/{id}",
                defaults: new { id = RouteParameter.Optional }
            );
        }
    }
}
Now everything is done, so time to implement a API controller as BlogController to get the data using service class. Which will get the data from database using Dapper and return as IHttpActionResult.
public class BlogController : ApiController
{
        IBlogService _blogService;

        public BlogController()
        {

        }
        public BlogController(IBlogService blogService)
        {
            _blogService = blogService;
        }
        public async Task<IHttpActionResult> GetAllBlogPostsByPageIndex()
        {
            var resultData = await _blogService.GetAllBlogByPageIndex(3, 4);
            if (resultData == null)
            {
                return NotFound();
            }
            return Ok(resultData);
        }
}
When we run the API project with following URL as shown in below image, it will return the output as following. Before run the project please check your database connection and database table, there should be some data available.
Please make sure as we mention database name in web.config. A table should be there as following script.
CREATE TABLE [dbo].[NextPosts](
	[PostId] [int] NOT NULL,
	[PostTitle] [nvarchar](500) NULL,
	[ShortPostContent] [ntext] NULL,
	[FullPostContent] [ntext] NULL,
	[MetaKeywords] [nvarchar](255) NULL,
	[MetaDescription] [nvarchar](500) NULL,
	[PostAddedDate] [smalldatetime] NOT NULL,
	[PostUpdatedDate] [smalldatetime] NOT NULL,
	[IsCommented] [bit] NOT NULL,
	[IsShared] [bit] NOT NULL,
	[IsPrivate] [bit] NOT NULL,
	[NumberOfViews] [int] NOT NULL,
	[PostUrl] [nvarchar](255) NULL,
	[CategoryId] [int] NOT NULL

)
And to get the data from table, I have created a stored procedure as following.
CREATE PROC [dbo].[usp_GetAllBlogPostByPageIndex](@PageIndex Int, @PageSize INT)
AS
BEGIN
	SELECT * FROM NextPosts ORDER BY PostId OFFSET((@PageIndex-1)*@PageSize) ROWS
	FETCH NEXT @PageSize ROWS ONLY;
END
GO
And please make sure connection string will changes as per our server, database and credentials for SQL server. Following is the sample example for connection string.
 <connectionStrings>
    <add name="DTAppCon" connectionString="server=My-computer;database=Test;UId=mukesh; Password=mukesh" providerName="System.Data.SqlClient" />
 </connectionStrings>
Now run the project as TestAPI and following output will be shown.

Conclusion:
So, today we have learned what Dapper is and why to use it. We also learned what is Repository Pattern and how dapper and repository pattern can be implement with WebAPI using UnitOfWork.
I hope this post will help you. Please put your feedback using comment which helps me to improve myself for next post. If you have any doubts please ask your doubts or query in the comment section and If you like this post, please share it with your friends. Thanks
Dapper
Web API
Posted Comments :

Mukesh Kumar Author Posted : 8 Years Ago
Thanks for your valuable comment.

Exer Posted : 8 Years Ago
Hello, first of all, thanks for article, i just wanted to ask how would you implement generic repository using dapper (for example GetAll and GetSingle methods), since i'm struggling to find anything useful on this subject... Thanks in advance
Hemanth Posted : 7 Years Ago
Thanks for article, It is very useful please keep posting more an more on webapi
Fabio Rodrigues Posted : 6 Years Ago
Great article. Can you give me an example of architecture with transaction support?
Diwas Poudel Posted : 6 Years Ago
Very thanks for providing connection of dapper ,repository, service pattern and UOW in one sample project. God bless You
Dunendra Sharma Posted : 6 Years Ago
Thanks for article, It is very useful please keep posting more an more on webapi
nuthan kishore Posted : 6 Years Ago
thank you for sharing Good Content For Beginners
saurabh Posted : 5 Years Ago
I was referring your article and using this i could not get how it will deal with this scenario. One business transaction involves making 3/4 stored procedure calls, some may be in Oracle some may be in SQL server. Data persistence is always in SQL server while some look up get operations are from Oracle. What i was hoping is generic repository will have a method to execute stored process along with an optional transaction scope. To this i would like to pass oracle/sql connection string, stored proc name and an optional transaction scope. If possible please put up this kind of example.
pardha Posted : 5 Years Ago
Actually the Iam looking for EntityFramwork + webAPI2+ dependency resolver +Generic Repository pattern with best performance Could you suggest such kind of article or any references
Shaurya Posted : 4 Years Ago
I Am Unable to understand one thing. That Is IConnectionFactory Is Just A Interface With The "Get" Property and In Blog Class, We Are Assigning To Get Which is logically Not Possible. Please clear this.


Ayaz Posted : 8 Years Ago
Nice article, Thanks for sharing